Advanced Concepts of ACL’s
Extended Numbered IP ACL’s:
The primary difference between standard ACL’s and Extended ACL’s is that instead of matching single Source IP, extended ACL’s match various headers of TCP, UDP and hence there will be more parameters to help in filtering the packets.
1. Matching Protocol, Source IP and Destination IP:
The general IP header consists of following components as shown in the below figure.

For protocol type we can use any as tcp, udp, icmp, …. and if you want to select all the ip packets then we can use the IP protocol. to write command for the Extended ACL’s we can see the image below.

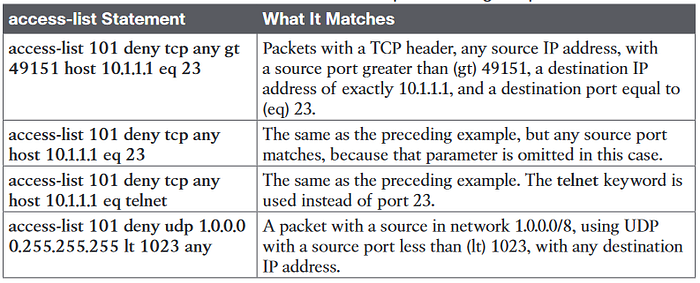
The below figure gives various examples of ACL statements. In an extended ACL access-list command, all the matching parameters must match the packet for the packet to match the command.

Matching TCP and UDP port Numbers:

When we specify the keyword tcp or udp as protocol in ACL command there is always optional situation to include its source and destination port numbers and while specifying port numbers we can use the logical operators and make the filtering more accurate for the application that receives it, and it can be observed the image below.

Let us consider the example in the image below. The FTP server sits on the right, with the client on the left. The figure shows the syntax of an ACL that matches the following:
■ Packets that include a TCP header
■ Packets sent from the client subnet
■ Packets sent to the server subnet
■ Packets with TCP destination port 21 (FTP server control port)

From the above figure you can observe that the packets are traveling from 172.16.1.1 to 172.16.3.1 and the server wants to filter packets from the host to its port 21 and hence the access-list command can be satisfied. The order and placing of the destination port is very important. now let us consider the flow of packets in the reverse. You can see the change in command and observer the port number placement in the command.

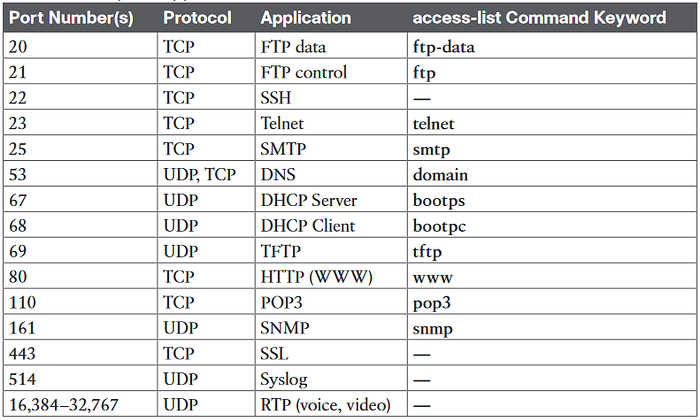
Having the knowledge on the popular ports and its application is very helpful for you. please refer to the image below for some of the well known ports and applications they use.
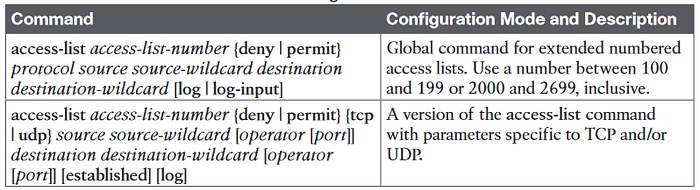
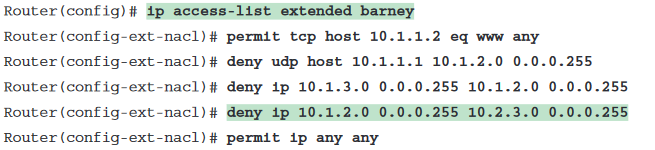
Some of the extended access-lists commands with the explanations are give below.
The command syntax for the Extended ACL’s is as follows.
Configure the ACL using access-list commands, and when complete, then enable the ACL using the same ip access-group command used with standard ACLs
When configuring the ACL’ s please keep the following points in your mind
■ Place extended ACLs as close as possible to the source of the packets that will be filtered. Filtering close to the source of the packets saves some bandwidth.
■ Remember that all fields in one access-list command must match a packet for the packet to be considered to match that access-list statement.
■ Use numbers of 100–199 and 2000–2699 on the access-list commands; no one number is inherently better than another.
Now let us consider a couple of examples so that we can understand Extended ACL’s a little better.
Example-1:
In the example below, we need to configure as follows. deny bob’s access to all the FTP servers on the router’s Ethernet. Deny Larry’s access to the web server on server 1.
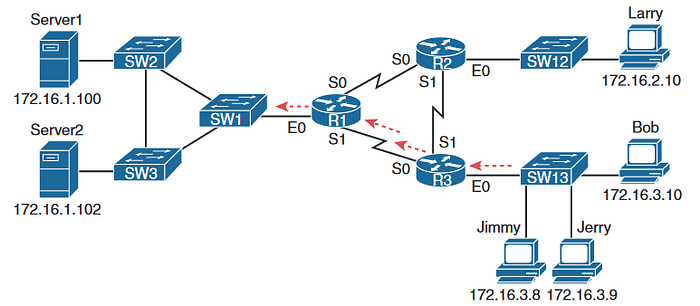
If we observe the above infrastructure as above, there are two ways to go to R1 i.e., from R3 →R1 via S0 and form R3 → R2 → R1 via S1. so we have to add access-lists on both the interfaces. first we need to add both interfaces to the access-group and then we need to provide access-list command as follows.
This is access-list that were configured at Router R1 at S0 and S1.
interface Serial0
ip address 172.16.12.1 255.255.255.0
ip access-group 101 in
!
interface Serial1
ip address 172.16.13.1 255.255.255.0
ip access-group 101 in
!
access-list 101 remark Stop Bob to FTP servers, and Larry to Server1 web
access-list 101 deny tcp host 172.16.3.10 172.16.1.0 0.0.0.255 eq ftp
access-list 101 deny tcp host 172.16.2.10 host 172.16.1.100 eq www
access-list 101 permit ip any any
As stated earlier we can save a lot of band width by configuring ACL’s as close as possible and hence we can configure the ACL’s at R3 E0 port.
interface Ethernet0
ip address 172.16.3.1 255.255.255.0
ip access-group 103 in
access-list 103 remark deny Bob to FTP servers in subnet 172.16.1.0/24
access-list 103 deny tcp host 172.16.3.10 172.16.1.0 0.0.0.255 eq ftp
access-list 103 permit ip any any
We can configure Larry’s traffic similarly at R2’s E0 interface.
Example-2:
The following example has to fulfill the criteria as follows.
■ Sam is not allowed access to the subnet of Bugs or Daffy.
■ Hosts on the Seville Ethernet are not allowed access to hosts on the Yosemite Ethernet.
■ All other combinations are allowed.
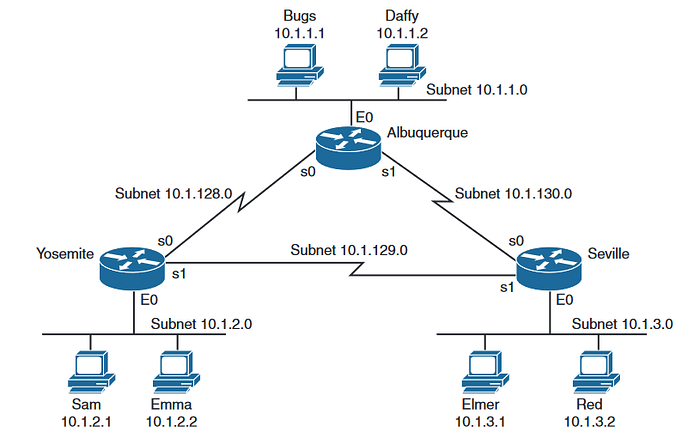
The following configuration was done at Yosemite E0 interface
interface Ethernet 0
ip access-group 110 in
!
access-list 110 deny ip host 10.1.2.1 10.1.1.0 0.0.0.255
access-list 110 deny ip 10.1.2.0 0.0.0.255 10.1.3.0 0.0.0.255
access-list 110 permit ip any any
The first command filters pacet from the sam from entering 10.1.1.0 network,
The second Command deny’s any host in 10.1.2.0 network to access any other host on 10.1.3.0 fulfiling our second criteria with very few lines of configuration.
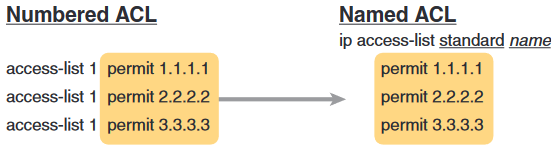
Named ACL’s :
There are a lot similarities between Numbered and Named ACL’s there are only negligible differences between them in terms of configuration. The main differences between them can be listed as follows.
■ Using names instead of numbers to identify the ACL, making it easier to remember the reason for the ACL
■ Using ACL sub commands, not global commands, to define the action and matching parameters
■ Using ACL editing features that allow the CLI user to delete individual lines from the ACL and insert new lines
The new command ip access-list is used to define a name and it also helps the user in entering the configuration mode. It can be seen as below.
We can use the no keyword to remove ACL command, which can be shown in the below figure.

ACL Editing:
There are numbers representing the sequence of statements in the ACL. ACL sequence numbers provide the following features for both numbered and named ACLs
New configuration style for numbered: Numbered ACLs use a configuration style like named ACLs, as well as the traditional style, for the same ACL; the new style is required to perform advanced ACL editing.
Deleting single lines: An individual ACL permit or deny statement can be deleted with a no sequence-number sub command.
Inserting new lines: Newly added permit and deny commands can be configured with a sequence number before the deny or permit command, dictating the location of the statement within the ACL.
Automatic sequence numbering: IOS adds sequence numbers to commands as you configure them, even if you do not include the sequence numbers.
To take advantage of the ability to delete and insert lines in an ACL, both numbered and named ACLs must use the same overall configuration style and commands used for named ACLs
Step 1.
Numbered ACL 24 is configured using this new-style configuration, with three permit commands.
Step 2.
The show ip access-lists command shows the three permit commands with sequence numbers 10, 20, and 30.
Step 3.
The engineer deletes only the second permit command using the no 20 ACL sub command, which simply refers to sequence number 20.
Step 4.
The show ip access-lists command confirms that the ACL now has only two lines (sequence numbers 10 and 30).
Step 5.
The engineer adds a new deny command to the beginning of the ACL, using the 5 deny 10.1.1.1 ACL sub command.
Step 6.
The show ip access-lists command again confirms the changes, this time listing three commands, sequence numbers 5, 10, and 30.
! Step 1: The 3-line Standard Numbered IP ACL is configured.
R1# configure terminal
Enter configuration commands, one per line. End with CNTL/Z.
R1(config)# ip access-list standard 24
R1(config-std-nacl)# permit 10.1.1.0 0.0.0.255
R1(config-std-nacl)# permit 10.1.2.0 0.0.0.255
R1(config-std-nacl)# permit 10.1.3.0 0.0.0.255
! Step 2: Displaying the ACL’s contents, without leaving configuration mode.
R1(config-std-nacl)# do show ip access-lists 24
Standard IP access list 24
10 permit 10.1.1.0, wildcard bits 0.0.0.255
20 permit 10.1.2.0, wildcard bits 0.0.0.255
30 permit 10.1.3.0, wildcard bits 0.0.0.255
! Step 3: Still in ACL 24 configuration mode, the line with sequence number 20 is
deleted.
R1(config-std-nacl)# no 20
! Step 4: Displaying the ACL’s contents again, without leaving configuration mode.
! Note that line number 20 is no longer listed.
R1(config-std-nacl)#do show ip access-lists 24
Standard IP access list 24
10 permit 10.1.1.0, wildcard bits 0.0.0.255
30 permit 10.1.3.0, wildcard bits 0.0.0.255
! Step 5: Inserting a new first line in the ACL.
R1(config-std-nacl)# 5 deny 10.1.1.1
! Step 6: Displaying the ACL’s contents one last time, with the new statement
!(sequence number 5) listed first.
R1(config-std-nacl)# do show ip access-lists 24
Standard IP access list 24
5 deny 10.1.1.1
10 permit 10.1.1.0, wildcard bits 0.0.0.255
30 permit 10.1.3.0, wildcard bits 0.0.0.255
Step 7.
The engineer lists the configuration (show running-config), which lists the old style configuration commands — even though the ACL was created with the new-style commands.
Step 8.
The engineer adds a new statement to the end of the ACL using the old-style access-list 24 permit 10.1.4.0 0.0.0.255 global configuration command.
Step 9.
The show ip access-lists command confirms that the old-style access-list command from the previous step followed the rule of being added only to the end of the ACL.
Step 10.
The engineer displays the configuration to confirm that the parts of ACL 24 configured with both new-style commands and old-style commands are all listed in the same old-style ACL (show running-config).
! Step 7: A configuration snippet for ACL 24.
R1# show running-config
! The only lines shown are the lines from ACL 24
access-list 24 deny 10.1.1.1
access-list 24 permit 10.1.1.0 0.0.0.255
access-list 24 permit 10.1.3.0 0.0.0.255
! Step 8: Adding a new access-list 24 global command
R1# configure terminal
Enter configuration commands, one per line. End with CNTL/Z.
R1(config)# access-list 24 permit 10.1.4.0 0.0.0.255
R1(config)# ^Z
! Step 9: Displaying the ACL’s contents again, with sequence numbers. Note that even
! the new statement has been automatically assigned a sequence number.
R1# show ip access-lists 24
Standard IP access list 24
5 deny 10.1.1.1
10 permit 10.1.1.0, wildcard bits 0.0.0.255
30 permit 10.1.3.0, wildcard bits 0.0.0.255
40 permit 10.1.4.0, wildcard bits 0.0.0.255
! Step 10: The numbered ACL config remains in old-style configuration commands.
R1# show running-config
! The only lines shown are the lines from ACL 24
access-list 24 deny 10.1.1.1
access-list 24 permit 10.1.1.0 0.0.0.255
access-list 24 permit 10.1.3.0 0.0.0.255
access-list 24 permit 10.1.4.0 0.0.0.255
The use of ACL’s can help with the security of the networks by a big margin, There are guidelines provided by Cisco regarding the use of ACL’s
■ Place extended ACLs as close as possible to the source of the packet. This strategy allows ACLs to discard the packets early.
■ Place standard ACLs as close as possible to the destination of the packet. This strategy avoids the mistake with standard ACLs (which match the source IPv4 address only) of unintentionally discarding packets that did not need to be discarded.
■ Place more specific statements early in the ACL.
■ Disable an ACL from its interface (using the no ip access-group interface sub command) before making changes to the ACL.
If you want to understand basic concepts of ACL’s click Here
Reference:
https://www.amazon.in/Exam-78-Official-Cert-Guide/dp/1587147130